
This guide provides a detailed walkthrough of the Employee Document Management interface within the iTacit platform. It covers how to add to employee-related documents. The functionality supports HR compliance, onboarding, and ongoing employee record maintenance.
Where to Access Employee Documents
Employee documents are securely stored and accessible through specific areas of the iTacit platform. Depending on your role, whether you're a manager or an employee, you’ll find these documents in slightly different places. This section will help you understand where to go and what to expect.
For Managers: My Team > Employee Profile
If you're a manager responsible for overseeing team members, you’ll access employee documents through the My Team section:
-
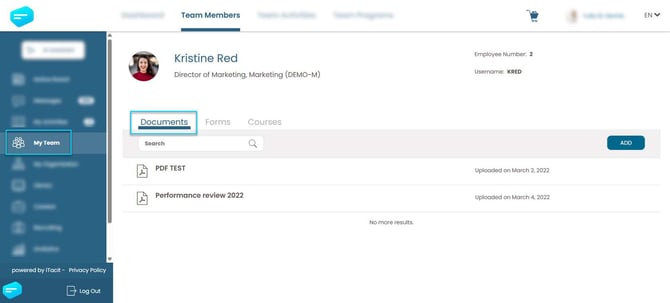
Navigate to My Team from the main dashboard.
-
Select a team member to open their Employee Profile.
-
Click on the Documents tab to view, manage, or take action on their uploaded files.
This tab provides a centralized view of all documents associated with that employee, including contracts, certifications, and performance records.

For Managers & Admins: Employee Manager > Employee Profile > Documents Tab
You can access your own documents through the Employee Manager section:
-
Log in to the iTacit Admin site.
-
Navigate to Menu > Employee Manager
-
Search for and select an employee
-
Select the Documents tab to view uploaded files.

----------------------------------------------------------------------------
Adding a Document
Adding documents is a key part of keeping employee records up to date. You can add documents from both the Employee profile view and the Admin Document Tab.
Adding a Document from the Employee Profile
This method is typically used by managers or employees with permission to upload documents directly to a profile.
- Log in to iTacit.
- Navigate to My Team.
- Search for and select the employee.
- Click View Profile.

- Go to the Documents tab.
- Click the Add to upload documents.

- Drag and drop the file into the upload area, or click BROWSE to select a file from your device.
- Complete the following fields:
-
-
What is in this document? – Provide a brief description (e.g., “2025 Safety Certification”).
-
What type of document is it? – Choose from the dropdown (e.g., Certification, Contract).
- To which of the employee’s roles does this document relate? – Select one or more roles (e.g., “Client Success Manager”)
-
9. Once all required fields are filled, click UPLOAD to save the document to the employee’s profile. If you change your mind, click CANCEL to exit without saving.

Uploaded documents will appear immediately in the document list and are subject to visibility permissions based on your role.
Adding a Document from the Admin Dashboard
Administrators can upload documents for employees using the Employee > Document tab in the Admin interface. This method is ideal for bulk uploads, compliance documentation, or centralized record management.
- Log in to the iTacit Admin site.
- Navigate to Menu > Employees > Employee Manager.
- Search for and select Employee, then click on the Document tab to manage employee files.
- In the top-right corner of the document tab, click the New button to begin the upload process. You’ll be prompted to choose between:
- Upload Single Document – for one file assigned to one employee.
- Upload Multiple Documents – for batch uploads across multiple employees or roles.

- Drag and drop the file into the upload area labeled “Drop a file here to upload it or Click to browse…” Alternatively, click to browse and select the file from your device.
- In the Employee Document pop-up window:
- What type of document is this? - Use the dropdown menu to select a category.
- What is in this document? - Enter a brief description (e.g., “Signed Application – October 2025”).
- Below the upload area, you’ll see a list of roles assigned to the employee. Select the role(s) this document pertains to by checking the appropriate boxes.
- Once all fields are completed and the file is uploaded, click Apply to finalize the process. The document will now appear in the employee’s record under the selected category.

Uploading Multiple Documents at Once
In addition to uploading individual files, administrators can also upload multiple documents simultaneously to streamline bulk updates or onboarding processes. From the Employee > Documents tab, click New, then select Upload Multiple Documents. This option allows you to drag and drop several files at once, categorize them by document type, and assign them to relevant employee roles or business units in a single workflow.

Admin uploads are ideal for HR teams managing onboarding, compliance, or performance documentation across departments. Documents added here are subject to visibility and permission settings configured in the platform.