iCourses are a great way to deliver online training through iTacit. Course material can be developed to include existing PowerPoint documents, policies, reference material, audio, and video.
1. Log in to the iTacit Admin site.
2. From the main menu, select Training.
3. Within the Course Library section of the sub-menu, click on iCourses.
4. In the Course Library, click the New button in the top-right corner.
5. Enter a clear, descriptive Title.
6. Enable the Allow Course Completion to report as completed once the defined criteria are met.
7. Define how course completion will be tracked. You can choose one or both of the following:
a. Pass all mandatory quizzes: Employees must pass a quiz to complete the course.
b. Achieve an overall passing grade: Employees must score at least 85% across all assessments.
8. Click Apply.
9. Set who can access the course by assigning a Permission Group. You can:
a. Choose a prebuilt group under the Permissions drop-down (e.g., “All Employees”)
b. Manually configure access using the Change... button

Create a New Page in your iCourse
Add new content to your course by creating a new component (section/page) or sub-component.
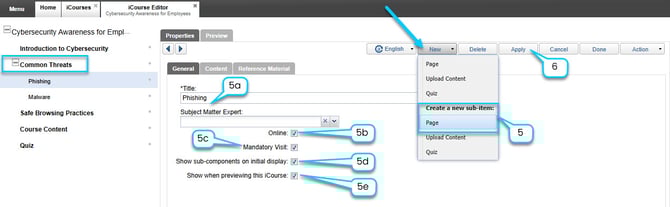
1. In your open iCourse, select New > Page.

a. Enter a Title for the page.
b. Place a check mark in the box by Online to ensure the section is displayed when taking the iCourse. (To inactivate this section, remove the checkmark).
c. Place a check mark in the box by Mandatory Visit if this section is required when taking the iCourse.
d. Place a check mark in the box by Show sub-components on initial display, if the section has sub-components, they will be visible when previewing the iCourse.
e. Place a check mark in the box by Show when previewing this iCourse, to display this section when an employee previews the iCourse from the Training Catalog.
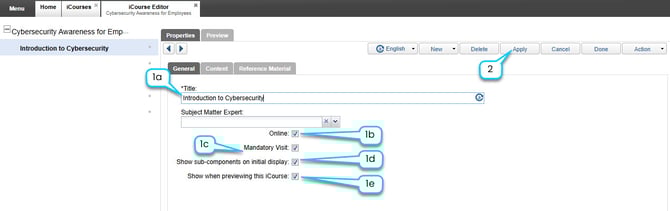
2. Select Apply.
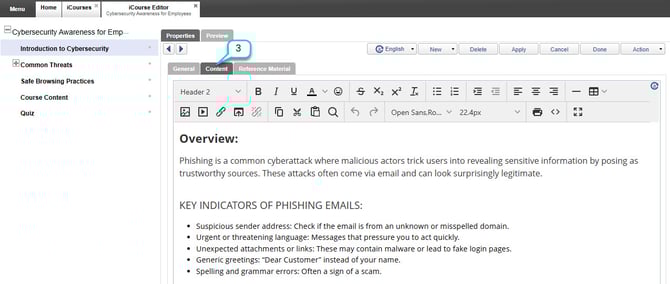
3. In the Content section, enter the desired text for this section of the iCourse.
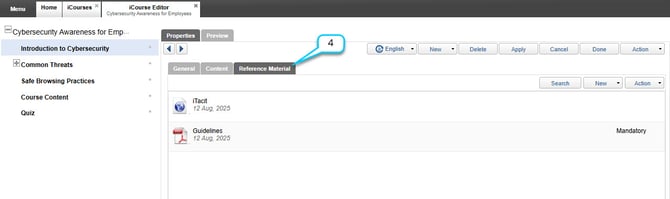
4. In the Reference Material section, attach any associated reference material such as links or documents. Place a check mark in the box by Mandatory to ensure the reference material is reviewed when taking the iCourse.
5. Using the Table of Contents panel on the side, create a sub-component by selecting the desired component, then select New > Create a new sub-item > Page. The sub-component will appear below the original.
a. Enter a Title for the page.
b. Place a check mark in the box by Online to ensure the section is displayed when taking the iCourse.
c. Place a check mark in the box by Mandatory Visit if this section is required when taking the iCourse.
d. Place a check mark in the box by Show sub-components on initial display, if the section has sub-components, they will be visible when previewing the iCourse.
3. Place a check mark in the box by Show when previewing this iCourse, to display this section when an employee previews the iCourse from the Training Catalog.
6. Select Apply to save.
Upload Content in your iCourse
Add file content to your course by uploading Word, PowerPoint, or PDF documents to your course.
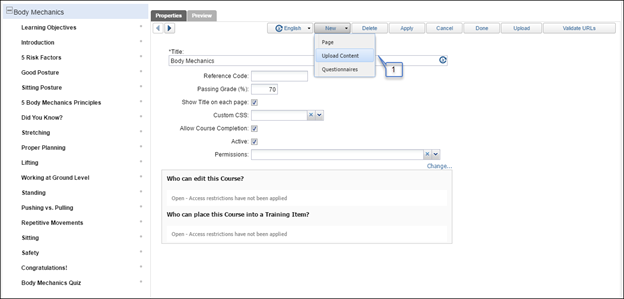
1. In your open iCourse, select New > Upload Content.
2. Enter the Title of your page with uploaded content.
3. Click to browse for the file on your computer, or drag and drop the file from the location on your computer. Confirm that the file was uploaded by checking the File Name field.
4. Click Apply to save the changes.
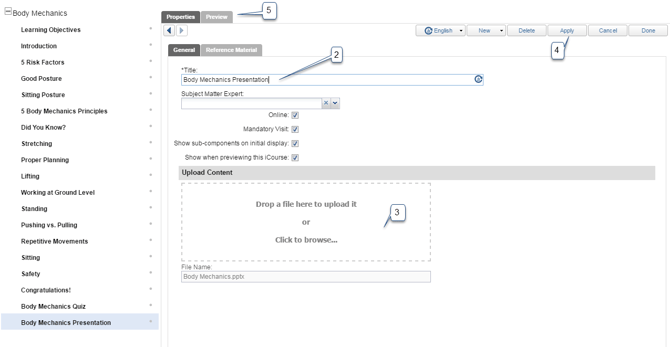
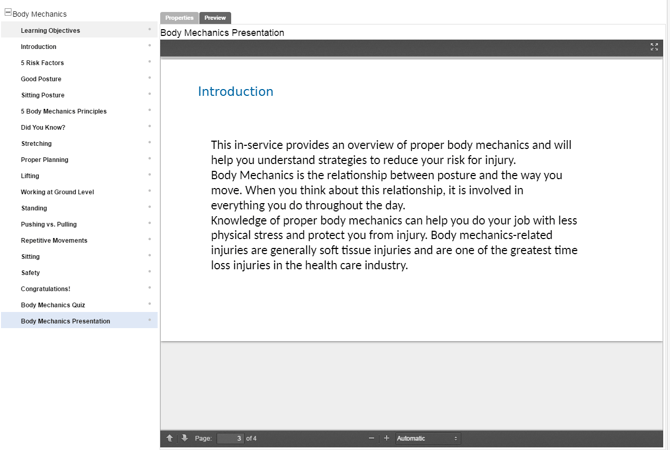
5. Select the Preview tab to view the content in the Document Viewer as a preview. (See the next page for a preview)
Create a Quiz in your iCourse
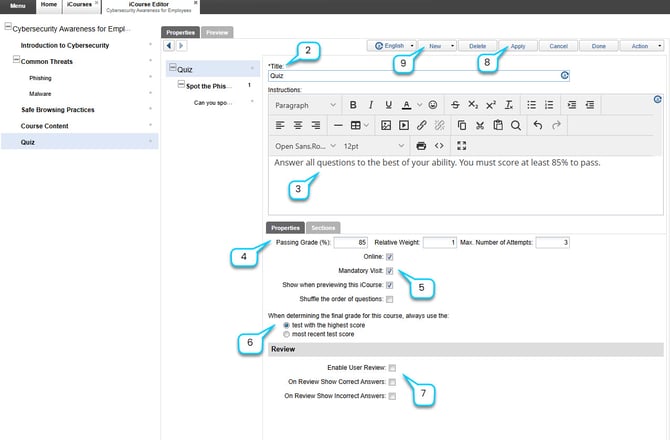
1. With your iCourse open, select the title of the course and select New > Quiz.
2. Enter a clear name for the quiz in the Title field.
3. Use the rich text editor to guide employees.
4. Under the Properties section:
- Passing Grade (%): Set the minimum score required to pass.
- Relative Weight: Determines how much this quiz contributes to the overall course grade.
- Max. Number of Attempts: Leave blank for unlimited attempts, or enter a number to limit retries.
5. Use the checkboxes to define how the quiz is delivered:
- Online: Makes the quiz visible within the course.
- Mandatory Visit: Requires employees to complete the quiz for course completion. Uncheck this setting for knowledge checks that will not contribute towards the overall score.
- Show when previewing this iCourse: Includes the quiz in preview mode.
- Shuffle the order of questions: Randomizes question order for each attempt.
6. Choose how the final quiz score is calculated if multiple attempts are allowed:
- Test with the highest score
- Most recent test score
7. Under the Review section, you can control what learners see after submitting the quiz:
- Enable User Review: Allows administrators to review employees' answers.
- On Review Show Correct Answers: Displays the correct answers after submission.
- On Review Show Incorrect Answers: Highlights which questions were answered incorrectly.
8. Click Apply to save changes.
9. Go to New > Section to add a section to your quiz.
10. Enter a descriptive Title for the section.
11. Use the rich text editor in the Narrative field to provide context or instructions for the section.
12. Toggle Show the title & narrative to show/hide the section title and description from the quiz.
13. Click Apply to save changes.
14. Once the section is created, use the New button again to add individual questions.

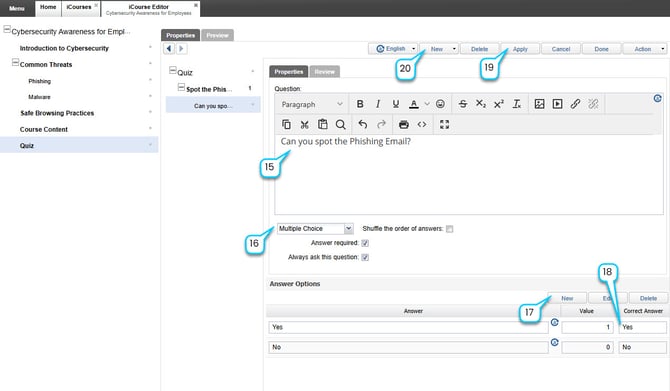
15. In the Question editor, type your question in the rich text field.
16. Below the question text, configure the following options:
- Question Type: Select from the dropdown (e.g., Multiple Choice).
- Shuffle the Order of Answers: Randomizes answer order for each learner.
- Answer Required: Employees must answer this question to proceed.
- Always Ask This Question: Ensures this question is always included, even in randomized quizzes.
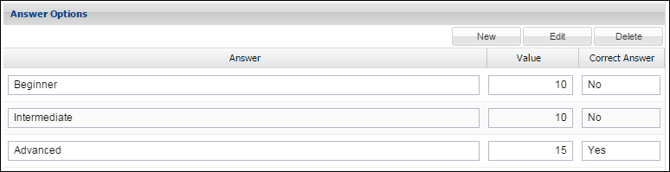
17. Under the Answer Options section:
- Click New to add each answer.
- Enter the text and assign a value to each option.
- Example:
- Yes → Value: 1 (Correct)
- No → Value: 0 (Incorrect)
- Example:
18. Under the Correct Answer column, select Yes next to the correct answer.
19. Click Apply to save the question.
20. Go to New > Question to add another question.
Understand Scoring in a Quiz
The two question types that are scored in iTacit are multiple choice and multiple select. A multiple choice question is scored out of the highest possible score (highest weighted response option), and a multiple select question is scored out of the total possible score (all response options added together).
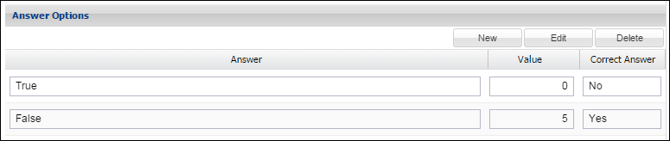
1) Basic scoring example:
Example Multiple Choice: Response options – Yes = 5; No = 0 – the total possible score is 5
Example Multiple Select: Response options – Yes = 5; No = 5 – the total possible score is 10
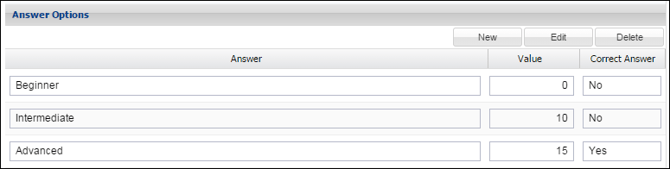
2) An example for a question with 3 response options:
Example Multiple Choice: Beginner = 0; Intermediate = 10; Advanced = 15 – the total possible score of the question is 15.
Example Multiple Select: Beginner = 0; Intermediate = 10; Advanced = 25 – the total possible score of the question is 35.
3) If you have a negative weight, this will lower the score.
Example Multiple Choice: Yes = 0; N = -5; the total possible score is 0
Example Multiple Select: Beginner = -10; Intermediate = 10; Advanced = 15 – the total possible score of the question is 15