Publishing a form is only part of the process - now it’s time to make it available to employees. That’s where Form Library Items come in. This configuration layer controls how your form is presented, assigned, and accessed in iTacit. Think of it as the bridge between your form and the end-user experience.
Example Scenario
You’ve published a “Position Change Request” form. Now you want to make it available to managers and HR.
-
Create a new Form Library Item.
-
Link to the published form.
-
Set the subject to “This form is about someone else.”
-
Enable visibility in the Library and Employee Record.
-
Assign permissions to the “HR Coordinator” and “Manager” roles.
Creating a Form Library Item
1. Log in to iTacit Admin site.
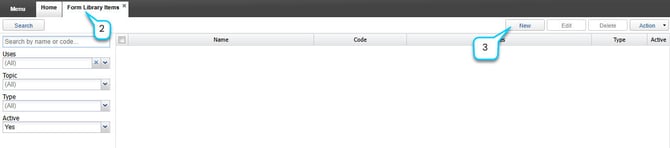
2. Navigate to Menu > Library > Form Library Items.
3. Click the New button to begin the setup process.
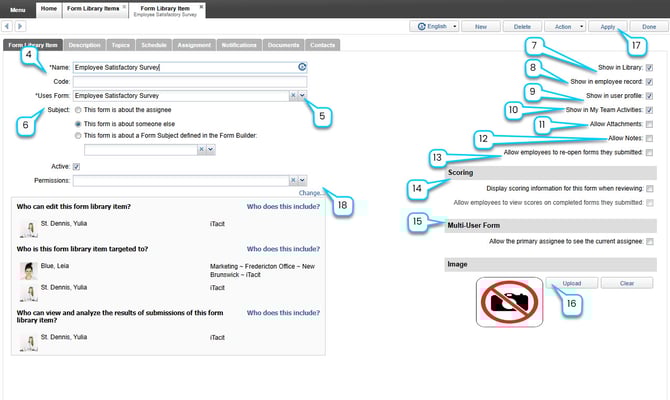
4. Enter a clear, descriptive Name for the form (e.g., “Employee Satisfactory Survey”).
5. Select the published form you want to link.
6. Define who or what the form is about:
-
This form is about the assignee: For this option, the subject of the form is always the same as the employee the form is assigned to. The form is assigned to the employee to complete, and the employee is also the subject of the form.
-
This form is about someone else: For this option, the subject of the form is an employee, but not the employee the form is assigned to. e.g., for a Performance Review form that is completed by a manager, the subject of the form would be the Employee the Performance Review is about.
-
This form is about a subject defined in the form: For this option, the subject of the form is the answer given to a question within the form itself. e.g., for a ‘Room Inspection Form’, the subject of the form would be the Room being inspected, e.g. ‘Large Meeting Room’).
7. Show in Library: Displays the form in the employee’s Library tab, allowing users to browse and start the form manually.
8. Show in Employee Record: Adds the completed form to the employee’s record for future reference. Select this check box if you would like the completed form to show in the Employee Record. This setting would typically be used for forms that are about the assignee or about someone else. g. Performance Reviews, Payroll Change Forms, Employee Orientation Forms, Employee Timecard Forms, Employee Expense Forms, etc. In other words, any form where the data being gathered in the form is about an existing employee and you would like to have that data tracked in that Employee’s record.
9. Show in User Profile: Makes the completed form visible to the employee in their personal profile. Select this check box if you would like the completed form to be visible to the employee who is the subject of the form. The user profile is information the employee can see about themselves; you may want to allow an employee to see their own performance review and timecard forms, but you may not want the employee to see a payroll change form that was about them.
10. Show in My Team Activities: Allows managers to view forms completed by or about their direct reports in the My Team dashboard.
11. Allow Attachments: Enables users to upload files (e.g., documents, images) while completing the form.
12. Allow Notes: Lets users add free-text notes to the form during completion. Helpful for providing context, comments, or additional information.
13. Allow employees to re-open forms they submitted: Gives employees the ability to re-open and view their own submitted forms.
14. Optional: Check the box for Scoring:
-
Display scoring information for this form when reviewing
-
Allow employees to view scores on completed forms they submitted
15. For the Multi-user forms: Allow the primary assignee to see the current assignee - helps users track progress and understand who is responsible for the next step in the workflow. Select this check box if you would like the person who started or initiated the form to be able to see who is currently assigned a multi-user form. Selecting this check box is helpful to see who is currently working on their portion of a form and aid in tracking the workflow of the form.
16. Image: You can upload a visual icon or image to represent the form in the Library. This helps users quickly identify the form.
17. Select Apply to save changes.
18. Choose a permission group to control who can see and manage this Library Item. You can select a predefined group or click Change... to customize access.